Wednesday, June 25, 2014

Pinterest DIY #1: Thinking of You Card


Hello bloggies,

For those of you who follow me on Facebook, you will know that a few weeks ago I stated that I wanted to try something off my Pinterest each weekend. I failed at doing anything last weekend due to being a bit busy, but I have just tried something tonight and I wanted to share!

Recently I have become interested in making my own cards and have found that Pinterest is a really great place to find some card tutorials and general inspiration. I have been slowly collecting some materials to make the card with. My amazing mother even sent me a care package with a bunch of tools and things to help me get started. Also, before I dive too deeply into this post I want to apologize for the photo quality. I am taking all of pics with my phone because I let my boyfriend take my nice camera with him on vacation and he won't be back until Friday and I just didn't want to wait that long.

The header picture of my blog really shows my whole collection and I wanted to get a little bit more in depth to what I use.


These are just a few of the tool that I have. Scissors, and exact-o knife, some little wire cutters and pinchers, and some punches in cute designs.  I do have a larger pair of scissors but I couldn't find them ANYWHERE!


All of this ribbon was given to me by my mother in the care package she sent me a few months ago. I think she found most of them at Joanne's on their little clearance sections in the scrapbook areas they have. It's some seriously cute ribbon even if it was cheep!


This is just some decorative items I have. I have some tape with cute patterns on them, some little buttons and sparkles, some cute cut outs and, of course, little cards!


This is the paper that I have. I know it's not a huge collection but for what I'm using it for it does the job! I also have a large stack of plain colored construction paper but I didn't honestly think it was exciting enough for it's own picture.


Finally, my glue! I have tacky clue, some roll on sticky tape stuff, and a ruler! You can't really make cards and expect them to look nice and even without a ruler! Right?

Well, now that you have seen my little collection it's time for you to be apart of my card making process. I generally like to sit on Pinterest and look for some idea/inspiration on my Chromebook. Once I have found a card that I think I can do I get started by choosing my colors and patterns with my paper. I have chosen to with with pink, a pink floral, a wood pattern, and a pop of green decorative tape.


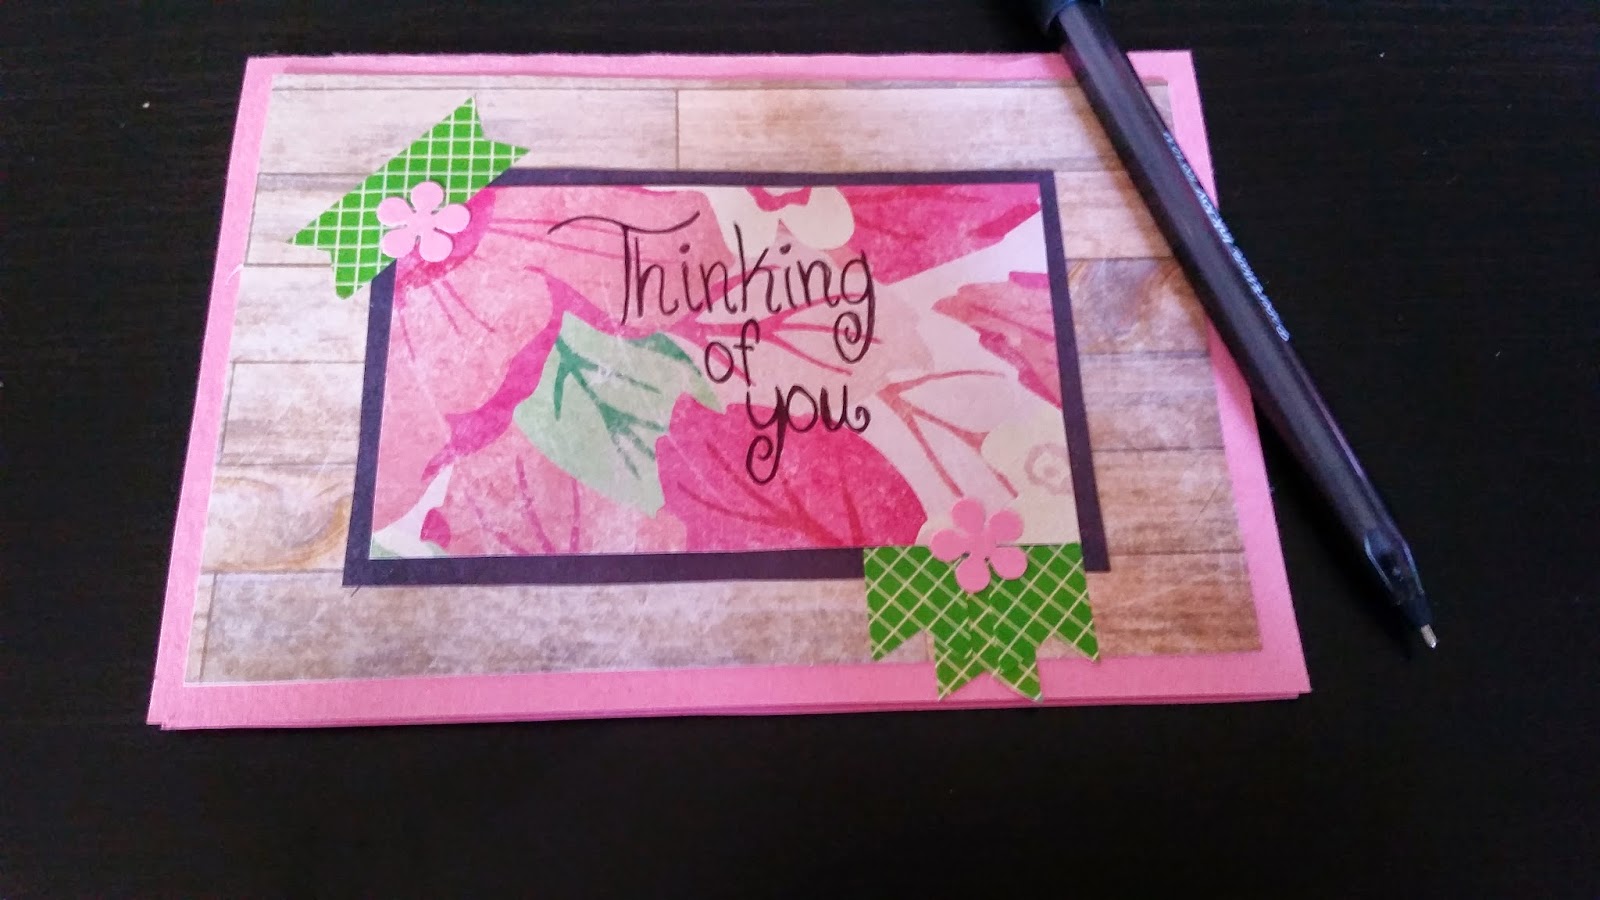
Doesn't that look so pretty together?? Next I cut out all of my pieces. For this card I decided to use the pink paper as the base of my card and kind of build up from their with the wood and floral paper. I also added a little bit of black paper to help add some drama and shading. The tools I used were my ruler, scissors, and a little pencil to help me with my straight lines. Then I just simply layed everything down to help eyeball where I want to glue my pieces.


My next step was to glue everything into place and add the cute little decorative tape to add that little pop of green.


I kind of wanted to stop here but then I thought that the card needed something else so I took my larger punch and punched out some pink flowers and but them in green tape just to break it up a bit.


Once I was happy with that I glued them down with tacky glue. Now because my printer is currently on the fritz I decided to hand write "Thinking of You" into the floral bit.


There you have it! My finished card!


I hope you enjoyed this post! It's a little bit different then what I have been blogging about but I think it's okay to branch out and talk about new things once in awhile. If you have any questions or just have something to say please leave a comment down below! Also, remember to follow me on Bloglovin'!

Byeee!

Tuesday, June 24, 2014

Life Update

Hello bloggies,

I'm sorry that I haven't posted anything in the last few weeks. I felt like I needed to explain but also do a little bit of venting as well. Not that I'm mad...just that I think writing about it may make me feel better? I'm not sure. This is an experiment..hopefully it doesn't make me feel worse.

I wanted to do just a quick update on what is going on in the land of Seri Sunshine. Last week I had the pleasure of flying back to my hometown in Oregon to participate in one of my best friend's wedding! I left early last Thursday and on my way to the Denver airport my car broke down...It was a mess. I immediately started having a panic attack and started crying and shaking and FREAKING out! The whole time I just kept thinking, "Oh my god, I'm going to miss my flight which means I am going to miss the wedding and throw off all of the plans for the night before the wedding and stress out the bride!" etc, etc. Then I call my mom, she calms me down and gets things situated for me. Well, I get everything set up to get my car off the side of the freeway but I still have no idea how I am going to get to the airport. By the grace of God a man who works at the airport pulls over and takes me the rest of the way and drops me off at my terminal (I need to send him a thank you card..)

Now, my trip home was nice and the wedding was absolutely amazing and I had a wonderful time but I couldn't help but stress out the whole time I was in Oregon because I kept wondering how I was going to get home and to work the next day. I had no idea what was wrong with my car other then the fact it wasn't working. I finally figure out how I am getting home from the airport and figure out a bus/train rout to get me to work...that helps relieve my stresses slightly. I was then able to get a towing company to tow it to a mechanics shop that is fairly close to my house and wait for the results. The really nice front desk lady calls me up later that day and tells me that my timer belt has broken. This is not good. Not only did my timer belt break but it also damaged other parts of my engine! So the lady talks me through the prices and it sounds like it's going to be $755 at the highest to get it fixed. Not too bad, right? It's not ideal but do-able. I give the to go-ahead and she says they will get started as soon as they can.

Well, this brings me to today. This morning I woke up and didn't feel quite right and about half way to work I puked at one of the train stations and had to go back home. Being sick! Yay! I didn't think that my luck could get any worse, except for that it did. The lady from the motor shop calls me and inform me that she miss quoted the original price and that it's going to be around $2,150!!?? WHAT?!? I don't have that kind of money!! *cue the next panic attack* At this point I just give up on life and call my parents. They kind of took it over for me and have chatted with the mechanic shop themselves and are helping me pay for things and pretty much say that I should start saving for a new car by next year because my current one isn't worth fixing again if it breaks down...

So, as you probably could guess, I have been a bit too stressed to do any blog postings lately. I am going to try my hardest to get one out by the end of the week but don't hold your breath for that.

Byeee.

Tuesday, June 17, 2014

Bloglovin'

Hello bloggies!

This is just a test post at the moment. I am currently trying to use Bloglovin' as I have found that it's much easier to follow blogs using that website. This is all for your convenience, I promise!

So..bare with me!

<a href="http://www.bloglovin.com/blog/12431267/?claim=e78s9qc2p5u">Follow my blog with Bloglovin</a>

Friday, June 13, 2014

My Tattoo: Owlfred!

Hi Bloggies!

I hope all of you are having a wonderful day! It is a wonderful, spring day here in Denver! The sun is shining, it's 70 degrees with a slight breeze and super lovely. I am out sitting next the pool in my little apartment area and was staring at my feet ( my toes are in desperate need of a pedicure) and was looking at my tattoo and went *lightbulb* I'LL DO A TATTOO BLOG POST!!! *ding* *ding* *ding*

So for those of you who follow me in twitter, tumblr, or instagram you know that I have gotten my little tattoo on my foot almost 2 years ago. It's the only one that I have. This is due to me being too scared to get another one and also if I ever wanted to get another one I'd want to be done by the same guy and he is located in Washington! So, quick background story on my tattoo: My best friend, Allie, lives in Washington and I went to visit her almost do years ago around this time of year. She had already planned on getting a tattoo while I was there and I was looking forward to it because I really wanted to see the process of getting one and what a tattoo parlor looked like and all that stuff. I did want to get my tattoo while I was in Washington but in the back of my mind I kept thinking I would just chicken out and wouldn't do it, but to my surprise, I did!  I brought the artists some pictures of what I wanted and he actually decided to sketch up a little cartoon looking owl for my foot and I just LOVED it!

The process of getting a tattoo is actually quite easier then what I had expected. I went in when they told me the appointment time would be . Then when it was time to take me back for my appointment they had me sign a little consent form and gave me instructions on how to take care of my fresh tattoo. After that I was seated in the little tattoo chair. Since I was getting one on the top of my foot I had to be up pretty high so I was sitting on what looked like a leather massage table. Everything was insanely clean (one of the most important things in my opinion) and the artist wore gloves and everything was wrapped to keep blood born pathogens from getting onto anything.

The next thing the artist did was press the sketch he did onto my foot for his outline.


He did the outline so, obviously, he could see what he needs to draw but to also make sure it's the size that I was happy with and the placement that I was happy with. I have him the go ahead and he started drawing. He kindly talked me through it, I think he could tell I was very nervous, and tried to explain what I was going to be feeling. He said it was like a pinch feeling but I honestly thought it felt like someone was slapping the top of my foot with a rubber band over and over and over. But, instead of that slap feeling lingering, the second he would lift the needle the pain would be gone. I'm sure the sensation is different for everyone and other areas of the body but that's how I can best describe how it felt on my foot. Also, before he really got going he did a quick little line to kind of prepare me for the feeling so I wouldn't jump and cause him to tattoo a scribble. :P


I would say, with my experience, the outlining was the most painful part. Especially when he got close to my pinky toe! Ouch! Although, the pain was never enough to cause me to cry or anything, just wince a few times. Once he got the shading it felt so much better. There will still bits that caused some wincing but not near as much. I just loved watching him do the shading because it brought all the life into the little owl.


Once he was done with the shading he did a little highlighting in the eyes and the feathers. I'm so happy he did that. It really looks like my little owl has a twinkle in his eyes!


And there is my finished owl! The whole process, start to finish, took about an hour and 20 minutes. I have since named him Owlfred. I thought that suited him perfectly! I could not be happier with how Owlfred turned out and almost cried because I was so happy. I was so worried that I was going to be one of those unlucky persons that get a horribly done tattoo, but I think it's far from horrible! It's perfect! 

Taking care of a fresh tattoo is not a hard task. Before I left the artist put what he called a finishing cream all over and wrapped my foot in plastic to protect Owlfred from my flip-flops. To prevent super quick fading I was instructed to not wear any shoes besides sandals for at least 2 weeks and to not completely submerge my foot into water, especially chlorinated water for at least a week. Also, to help the healing process I was instructed to get some unscented, un-tinted lotion and to apply it to my foot at least twice a day. My tattoo is now happy, looking good, and still twinkling back to me every day!

If you have any questions about the process that I didn't already address please leave them in the comments below and I would love to answer you to the best of my abilities! Honestly, my best friend Allie would be better to ask since she has more tattoos than I do and is more wise! She has more tattoos in other areas of her body as well and I am sure she would love to answer any questions. You can find her on Tumblr and I will leave her info down below along with mine! I'm going to end this with some random pictures I took on my Washington trip and a picture of my bestie and I! 

Byeeee!!!


Allie's Tumblr: http://zebrazet.tumblr.com/

My Tumblr: http://serisushi.tumblr.com/
My Instagram: serileri


Sunday, June 8, 2014

May Favorites!!

Hello Bloggies!

It is the end of the first week in June and I was sitting in my comfy pants, watching the rain poor on this Sunday afternoon and thought, "HEY! I could talk about my most used/favorite products I used last month!" So, here it is! My May Favorites!! (Yay!) I will be mostly talking about my favorites in beauty and hair in this post. I was trying to think of other favorites of mine in other categories like..shows..music..things of that nature but I bounce around so much with things like that I just couldn't think of one particular favorite. I am going to try and make an effort to add more of those types of things to my June favorites!

I also want to mention that I am not a professional makeup guru or hair guru. These are just my own, personal opinions on these certain products and if you disagree with what I have to say then that's great! Everyone is entitled to their own opinions! If you happen to agree with what I have to say that is also great! I also want to apologize for the photos. I could not find my camera's battery charger for the life of me so I took and edited all these photos on my phone! I don't think they came out too horribly but they aren't my best either.

Let's begin with some makeup!
This is the Nars Sheer Glow Foundation in Mont Blanc. I know I have talked about this in a previous haul but this is still my all time favorite foundation so far. It lasts so long and is just the perfect shade for my skin and just sits so nicely with my skin type. When I first got this foundation I has used it for a couple of weeks and then DROPPED the bottle on my bathroom floor and it SHATTERED into a million pieces! I was so, so angry! Around mid May I finally got to replace it and am being very careful with it now by not leaving it on the edge of  window sills...

I have never been a highlighter wearer in the past. I very rarely used it and when I did it would only be in the corner of my eye or on my brow bone, never on my face until this year. With Spring being here it's nice to have a bit of a highlight on my cheeks and temples as it just makes my face look nice and bright. This is High Beam by Benefit and so far it's been my favorite! It's a liquid highlighter that has a type of nail polish looking applicator. I just dot it where I want it and blend with my fingers and *poof* a lovely, highlighted, brightened cheek bone. I also use this for my brow bones as well but I wouldn't recommend it for your inner eye corner for it is liquid and may get into your eye.

My next item is a little pot of poo! Just kidding! This is the Maybelling EyeStudio Gel Eyeliner in brown. All my life I have used liquid liners and watched a makeup tutorial by Tanya Burr (I have linked her YouTube channel in her name, please go check her out!) and she was using this gel liner and I thought I'd give it a go. I am very happy that I did! This liner is so long lasting and so easy to apply it's ridiculous! I can easily make a thick, dramatic line or a thin line that I can smudge out for a smokey look. Plus, it comes with it's own brush! It may look a bit like poo when you start to use it but it's far from it and wonderful on your eyes!

This is the last of the makeup type things. This is the Benefit Pore-Fessional PRO Balm. I'm not actually quite sure if this really is a primer.. it says it's a PRO balm that minimize the appearance of pores. I use it as a primer and I think it works wonderfully. It definitely does minimize looks of my pores and just helps my Nars stay on my face even longer. With being a dental assistant and wearing a mask off and on all day I can certainly tell the difference on how long my foundations stays on my face when I do or don't wear this. Also, it feels very light weight on my skin and doesn't feel like it's going to break me out horribly which is a HUGE plus in my book.

Now on to some hair products! I really neglected my hair the past couple years and just this last month have started to take better care of it. I got my hair cut and colored by a professional and got a lot of tips from her and also have gotten a lot of tips from the YouTube girls that I love.

Now, I know this is just shampoo and conditioner BUT this shampoo and conditioner have saved my hair! It is the Tresemme Expert Selection Renewal Hair & Scalp with tea tree extract and sunflower seed oil. That is quite the mouth full! I have always used Tresemme for my shampoo and conditioner and saw this was out and didn't really pay much attention to it until another one of my favorite YouTuber's did a little review on it and couldn't say better things about it. I, of course, went out the next day and got some of my own and am so happy that I did! I don't know if it's because my hair really likes tea tree and sunflower seed oil or what but my hair is so soft and clean and smells SO amazing after I wash my hair! It's just THE BEST! I highly recommend this to everyone in the world!

The other hair care product I have been loving is the Tony & Guy Heat Protection Mist. I have never, ever used a heat protectant before until last month and I have noticed quite a large difference in my hair. After using my flat iron or my curling iron my hair just doesn't feel so..straw like and dry anymore. I just mist this all over my damp hair and comb it in before I blow dry my hair and then I mist it and comb it in right before I use any heat to my dry hair. I did splurge a bit by getting the Tony & Guy brand so would love any input from you guys on a heat protectant that is at least $20 or under! Please leave some of your suggestions in the comment box below!

The next item I use I, stupidly, don't have a picture for. For some reason my phone won't share the photo with my google docs and I am tired of trying.. Anyways! I use the Catwalk TIGI Root Boost. I LOVE THIS PRODUCT! I just simply section my hair and spray a bit of it (it comes out as a moose) and I just rub it all over, blow dry my hair upside down, and my hair is just so full and fluffy! I mainly love this product because it doesn't weigh down my hair. I have extremely thin and fine hair and if I wear too much product it just weighs it down and slicks to my head. This does not do that in the slightest. I highly recommend it to people who have the same hair type and just needs that extra lift!


Alright fellow bloggies, that's my May Favorites. Please let me know if you enjoyed this by commenting below! If you have any suggestions of products that you think I may like let me know as well! Also, if you have any ideas of things you would like me to blog about in the future leave them in the comments and I will do my best to make you happy!

Byeeee!